Making a Perfectly Tender Chicken Breast is incredibly easy. But many people still serve dry, tasteless, chicken breasts. Why? I have no idea. But I plan on ending that practice once and for all. Friends don’t let friends make dry chicken breasts.
(This post contains affiliate links.I may make a commission from sales, your price remains the same)

Three Keys to Making a Perfectly Tender Chicken Breast:
- Bone in, skin on! The bone and the skin make for the most flavorful, tender Chicken breast.
- Brine: Don’t be intimidated! It’s as simple as soaking the chicken in salt water for 30 minutes.
- Start on the cooktop, finish in the oven. Tender inside, crispy outside.And there you have it! How easy is that? Serve with my Roasted Veggie Salad and you have a nutrient dense, colorful, delicious dinner!

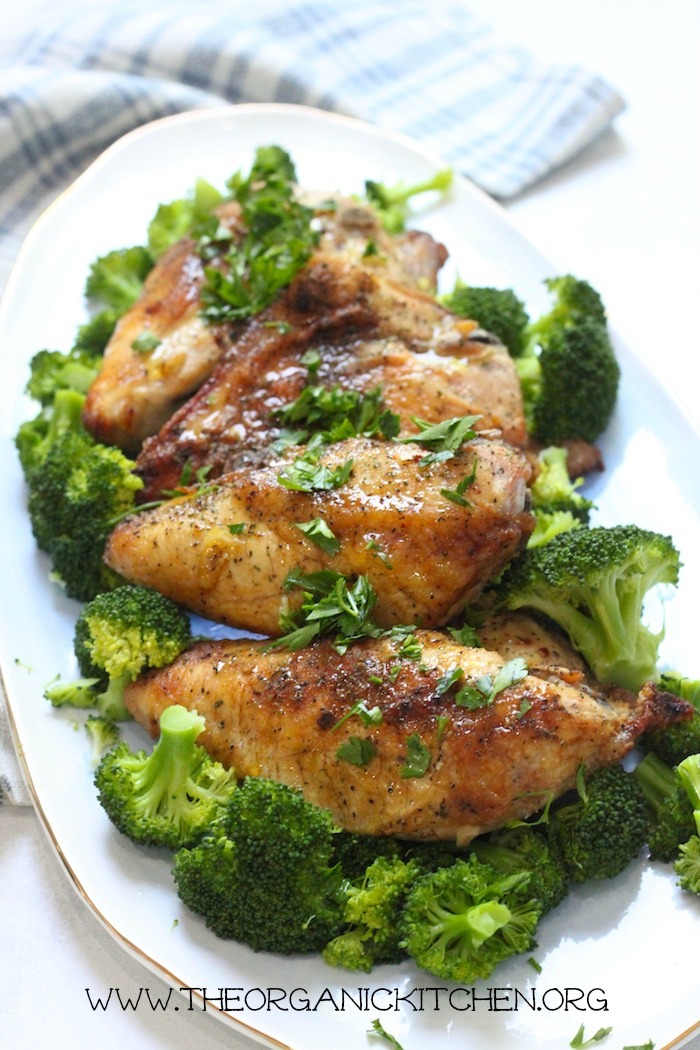
The Recipe: How to Make a Perfectly Tender Chicken Breast
Tips, what you will need and what to serve it with! You will need an oven safe pan and a good sea salt: I use fine himalayan sea salt for brining. People often overcook chicken, making it dry. Please resist that temptation! Serve this chicken alongside any of my salads, vegetable purees, or roasted veggies. This chicken is grain free, gluten free, dairy free, Whole 30 and Paleo.

Achieve a perfectly tender chicken breast every time!
- 6 cups water
- 1/3 cup sea salt, I use fine Himalayan but you can use kosher too
- 3 chicken breasts, bone in, skin on
- pepper
- garlic powder
- 3 tablespoons olive oil
-
Place breasts in water with sea salt and allow to soak for at least 30 minutes,.
-
Preheat oven to 400 degrees.
-
Place rack in upper third of oven.
-
Remove breast from salt water and pat dry with paper towel.
-
Sprinkle with garlic powder, sea salt and pepper.
-
Pour olive oil into oven safe pan on med /high heat.
-
When olive oil is hot, add chicken skin side down to pan.
-
Lower heat to medium if needed. Cook for five minutes or until skin is golden.
-
Turn chicken skin side up.
-
Transfer pan to oven and cook for 20-30 minutes depending on the size of chicken breast. Small breasts will cook quickly, some of those monster size ones can take a while!
-
Do not overcook.
-
Remove from oven when done and serve.
You can also use this technique on grilled boneless skinless chicken breasts! Enjoy ~ Linda Spiker
MAY I PLEASE ASK A LITTLE FAVOR?
We small bloggers need all the help we can get. Subscribing and sharing on social media is very appreciated!









Yum! We eat a lot of chicken breasts and these look awesome.
LiveLifeWell,
Allison
I needed this post! I can cook a mean steak, but when it comes to chicken it ALWAYS turns out dry… I’m going to try this tonight!
Hope you love it!
Love this meal. Chicken is used a bunch around my house.
Thanks Linda! I always use boneless, skinless chicken breasts. I will have to change that.
I have a method for those too but you want those good fats!
LOVE these tips! I don’t brine my chicken breasts nearly enough and I really need to remember to do that. It makes such a difference.
I do just about the same thing with my chicken breast to cook them. When I’m in a hurry and do not have any time I will saute the chicken breast over the cook top and use broth or water to saute. I keeps the chicken nice and tender! Great post, thank you!
Thanks for all the helpful hints!! I haven’t thought of brining just a chicken breast before, I’m sure that keeps it extra moist – love that pan too – want one!!
What pan? What do you recommend Linda? I must have overlooked it above.
Hi Kendra, I don’t recommend any pan specifically in this post other than that it needs to be oven safe. If you want to look at some pans I recommend you can click on my store in the navigation bar:)
This looks so good. I tend to buy big bags of boneless breasts but I need to maybe start getting bone in more often because this looks amazing
Yes! We need those good fats!
What do you mean we need those good fats? The fat skin of a chicken breast is good to eat? I always get it without. Isn’t it better without?
Hello and thanks for a great question,
Saturated fats found in animal products are good fats. People ate them for millennia with no ill effects. It wasn’t until the overconsumption of grains and sugar that heart disease, diabetes, obesity and inflammatory diseases became epidemic. If you think about, no one gets fat from eating chicken skin. Because they simply don’t overeat it, they just eat what’s on a breast or a thigh. On the other hand people frequently overeat cake, candy, bread, pasta, and other nutrition-less, high calorie, high glycemic foods that cause inflammation. Besides that, fats give us energy and the skin adds flavor and helps keep you full longer! Thanks again for the question!
Interesting that a non-stick ceramic coated pan can brown the chicken skin like this. And the pan is non-toxic and you can finish it in the oven? I’ll have to check out the pan! Thx for the review!
It’s a really heavy pan. It almost feels like cast iron. And it does brown but the chicken gets even more brown in the oven 🙂
So easy! 🙂 Do you think this method works well for whole chickens, too?
I am sure it does because it’s a popular thing to do with turkey!
This looks so good! I’ve really been wanting to get Xtrema Ceramic! I’ve heard lots of good things about it.
Part of why I almost always go for dark meat is because every time people make chicken breast for me it is not tender – this will help!
Tender Chicken = The best…. *drool*
Great, solid tips! I’m always surprised at how temperamental chicken can be. I make it all the time but I’ll admit I typically skip brining, but only because I’m lazy. Will have to try to make more time for it to see how it compares 😀
These are some really great tips! I actually ended up buying a sous vide because I kept failing at making edible chicken breast. However, I think you have made some great points as to why I couldn’t get the chicken to turn out the way I wanted. I will definitely give these a try! <3
Oh I want a sous vide…except the idea of heating in plastic bothers me. Have you found a way around that?
Love your opening paragraph! These look great! Love that the skin is left on! 🙂
I never think to brine those chicken breasts but that is so key! Thank you for the reminder!
I buy kosher breasts. I wonder how soaking them again in salt would affect them? I think I will opt for skin and bone from now on instead of boneless version. Thanks for the tips.
I would think if you buy kosher you wouldn’t need to brine them.
This chicken looks picture perfect!
You have great tips in this post. They are helpful to novice cooks, as well as seasoned cooks. Great job
Thank you Rini!
This chicken looks picture perfect!
Would/ could you brine chicken pieces and then fry ?
You eman instead of using an entire breast? I don’t see why not.
Excellent instructions and explanation re:tips..knowledge and experience cooking chicken. I have never brined befire have made fresh pickles though..thanx!
Since I’ve read this recipe I’ve brined my chicken breasts every time I cook them. It’s a wonderful thing. No matter how you finish the breaths, always start with brining. It’s so easy to do and you will never have another dry chicken breast again! TYVM!
Yay! I am so glad to hear that. It’s a great method!
I am making boneless and skinless chicken with mayo and Parmesan coating. Should I brine before?
Great question! You can brine before just about any recipe if you want them to be a bit more tender and juicy, so yes!
Delicious and easy to make thank you!
You are welcome! Thanks for commenting:)
Quick question – if you wanted to make this ahead of time, can you cook, then place in fridge and put in oven warmer when ready? What are your tips on this? I would like to make this in early afternoon for dinner
i know it’s always best to make right then and there, but with kids and chaos it’s easier for me to make ahead…
thanks
kaveri
Hi! Great question! I frequently cook a lot earlier in the day and reheat for dinner because I need that morning light to photograph food:) I think these reheat way better than the non-brined option because they are so moist. That said reheating almost always takes away a little moisture but these should fare well reheating in the warmer. Good luck and let me know if they stayed tender please!
This is perfect for the seasoned foodie or the beginner, so much great info!
I made these last night for dinner. The only difference was that I brined my chicken for about an hour and a half, and I used 1/4 tsp. onion powder and 1/4 tsp. lite salt in addition to a 1/4 tsp. garlic powder and about 1/8 tsp. of black pepper to season. The two split breasts package I used weighed 2.63 lb. and it took about 50 to 55 minutes to get them done. I checked them at 45 minutes and they were still very slightly underdone. They turned out tender, moist, and most delicious!! I will be making them again and I may try adding a little smoked paprika the next time. Yum!!
Thank you for your comment Lorrie! I am so glad you liked the recipe…even if it took a little longer to cook:)